

Click "Create Account"
Google Tag Manager
Google Tag Manager (GTM) is a great way to add Pubble widgets onto your website. Why? Because it allows you to add the Pubble code without having to edit the source code of your website.
Note: typically you will put GTM code on every page of your website, therefore it is only recommended you use GTM with Pubble Live Chat
Required: Google Tag Manager Account & Container
If you are reading this guide, we are assuming that you are already using Google Tag Manager. If you're not and wish to use Google Tag Manager to deploy Pubble Live Chat, then you will first need to create a Google Tag Manager Account and set-up a container. Brief instructions on how complete this are as follows:
GTM Account Setup
- Sign into your Google Account
- Open: tagmanager.google.com
- Click "Create Account"
- Name your account and click Continue.
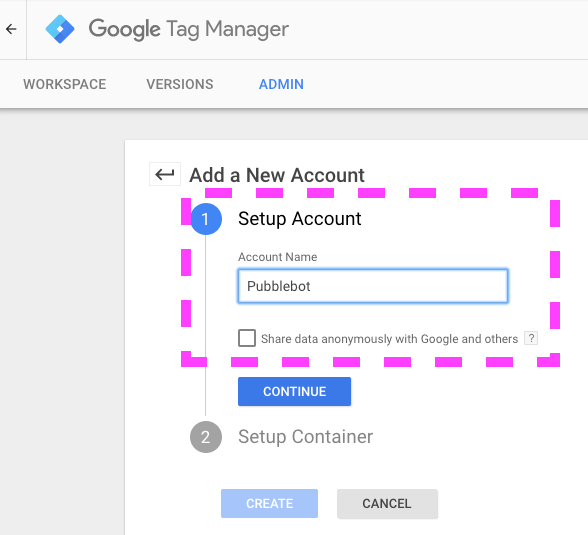
Name the account
Setting up a Container
After you click Continue, the next step is to set-up a Container.
A container is used to contain all your tags (GA, Adwords, Pubble Live Chat).
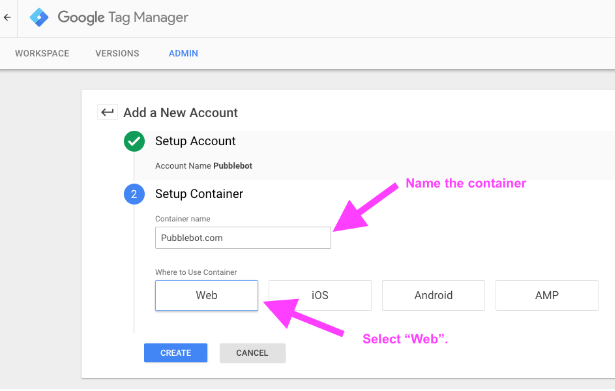
Setting up the container
- Give the Container a Name and select "Web" to define where the container will be used.
- Click Create and Agree to the Terms.
- Next you will get a popup with the code snippet. Copy the code snippets and paste into every page of your site just below the opening tag.
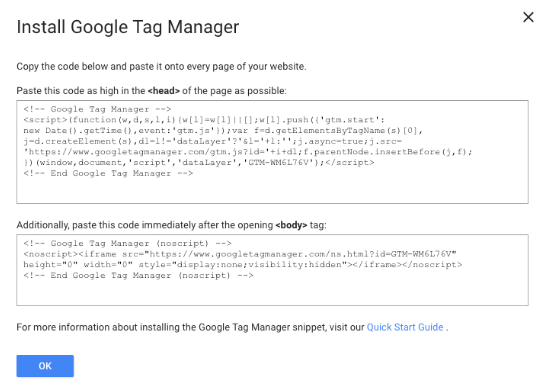
Paste the code into your website HTML
Click OK.
After you have added the container code snippets to your website, you are ready to install Pubble Live Chat into the Container. Here's how to complete the install.
Installing Pubble Live Chat
Adding the Pubble Live Chat code using Google Tag Manager
Paste the code into your website HTML
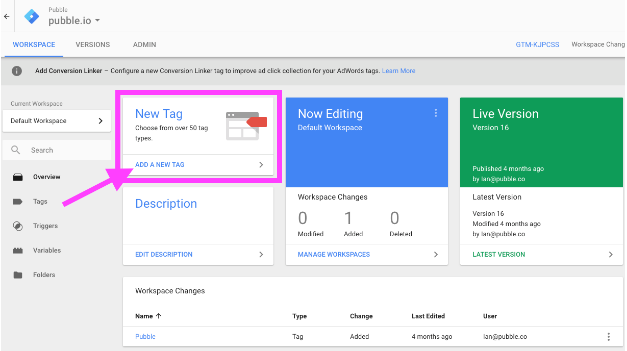
- In your GTM Workspace, click the "Add a New Tag" option.
- A new window will slide open

Paste the code into your website HTML
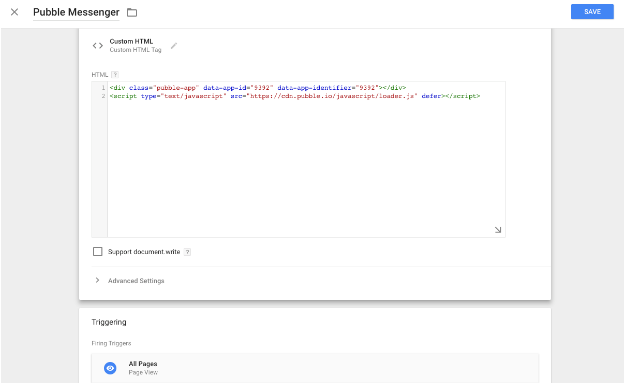
- Click "Untitled Tag" and rename the tag "Pubble Live Chat"
- Next, click on Tag Configuration. From the Tag Type List, choose Custom HTML.
- Paste your Pubble Live Chat Code Snippet into the HTML container.
Note: Your Pubble Live Chat Code Snippet is available from the Pubble admin section. Go to your Pubble Community (yourteamname.pubble.io/admin). Click on Apps > Live Chat and copy the code snippet from the Deploy Code section.
- Scroll down to the Triggering section. Add a rule that will trigger on All Pages.
Note: If you are following these instructions to add a Live Q&A, Live Blog or Community QA app to your site, don't select "All Pages". Only define the page where the event is running.
Paste the code into your website HTML
Then click Save.
- Click Submit. You will be asked to name the changes and write a descriptive note.
- Click on Publish.
The widget code will now be deployed to your website